NES Emulation: The Good, The Bad, and The Tedious
Very slowly over a period of around a year, I wrote a NES emulator. It was the first emulator I’ve written, and it was the first non-trivial project for which I used the Rust programming language.
One of the original reasons I wanted to write an emulator was because it was something I had been exposed to through various IRC communities that I’ve been apart of since I was a teenager in the late 90s and early 2000s, and it was also of interest to me because of my own life-long love for retro gaming dating as far back as getting the original Game Boy for Christmas (which I then complained about, because the box that it came in was smaller than the box my brother’s Christmas present came in).
It’s been a fun experience to travel back in time and appreciate the history and architecture of old systems, so I wanted to highlight some of my favorite parts of emulating the NES.
CPU
The NES used a MOS Technology 6502 for its CPU, with the official designation of 2A03 for the NTSC version, and emulating the CPU was where I - and most emulator developers - decided to start.
I had zero experience with the 6502 beyond reading about the early days of Apple and Steve Wozniak’s stories from the Homebrew Computer Club, but it has a fun history in retro gaming and computing, also being used in the Atari 2600, and the Commodore 64, among many other iconic systems.
It has a 16-bit address space, three registers, a stack pointer, a program counter, and a bunch of status flags. This isn’t anything new for anyone who has ever had to debug something in gdb, or has written any assembly for any other architecture before.
The 6502 was a lot of fun to implement, to the point that I would recommend writing a 6502 emulator on its own as a fun project, if a full gaming emulator seemed too big of a project for the amount of time someone may have available.
ADC and SBC
The most interesting instructions in the 6502 are the ADC (add with carry) and SBC (subtract with carry) instructions, and the funny little relationship between them.
The ADC instruction adds a number to the accumulator register, and if the carry flag is currently set, an additional 1 is added.
Executing this instruction will update some of the CPU flags, specifically the sign flag, the zero flag, the overflow flag, and carry flag. Most of the flags are simple to determine the value of, but the overflow flag is slightly problematic.
The point of the overflow flag is to, in the world of signed 8-bit integers (with a range of -128 to 127), figure out if adding the two numbers together has overflowed or underflowed. It’s impossible for a negative 8-bit number and a positive 8-bit number to overflow when added together, so the only cases to worry about are when adding two negative numbers together results in a positive number, or when adding two positive numbers together results in a negative number. If this happens, the overflow flag must be set.
In binary, the sign of a number is determined by the most-significant bit; a 1 signifying a negative number, and a 0 signifying a positive. The exclusive-or bitwise operator is a neat little tool to check if the sign of two numbers is the same (whether it’s 1 or 0 is irrelevant). The result of this can be and‘d with 0x80 to test the most-significant bit:
if (accumulator ^ value) & 0x80 == 0 {
    // they're either both positive, or both negative
}
That’s only half the problem solved though. The overflow flag still requires checking if result of the addition was a different sign to the parameters. Either of the two parameters can be used to check against the result, in this example the value in the accumulator register has been used.
let result = accumulator + value + carry;

if ((accumulator ^ value) & 0x80 == 0) && ((accumulator ^ result) & 0x80 != 0) {
    // the addition overflowed!
}
The SBC instruction subtracts a value from the accumulator register, with an extra 1 subtracted from the result if the carry flag is NOT set. There is a similar complication with the overflow flag, however SBC has a handy relationship with ADC.
A bit of rearrangement proves that SBC is almost the same as ADC:
ADC = A + V + C
SBC = A - V - (1 - C)
SBC = A - V - 1 + C
-V can be expressed as an unsigned number in two’s complement as !V + 1, so this results in:
SBC = A + !V + 1 - 1 + C
SBC = A + !V + C
This means that SBC can be implemented by reusing ADC and supplying the one’s complement - the inversion of all bits - of the value to subtract:
fn sbc(&mut self, val: u8) {
    self.adc(!val);
}
Graphics
The PPU, or Picture Processing Unit, with the official designation 2C02, is the component that’s responsible for rendering graphics to the screen, and oh boy, was this an experience that all NES emulator developers treasure, in a manner of speaking. Unlike the CPU, the PPU used in the NES was purpose-built specifically for the NES, and runs at a different clock rate than the CPU does.
Graphics are based on tiles that are 8x8 or 8x16 pixels in size. The raw tile data is stored in what is referred to as pattern tables, also documented as character RAM/ROM, or CHR.
As an example, here’s the first level of Donkey Kong, with the pattern tables on the right, and tile borders laid on top of the rendered output.
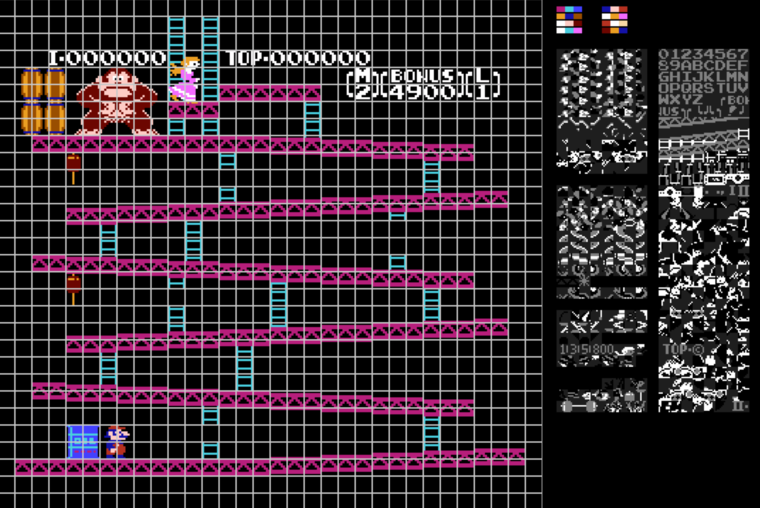
With a bit of squinting, we can see how some of the tiles on the right make up what’s been rendered on the left.
The background maps its individual tiles to patterns in the pattern table by what is referred to as the nametable.
Sprite positions are mapped to positions on the screen by a part of memory referred to as Object Attribute Memory (OAM). At most 64 sprites can be used on a single frame, which sounds like a lot, but keep in mind that multiple sprite entries make up a single game “item” if it doesn’t fit in a single 8x8 tile, e.g. as above, Mario is made up of four sprite entries, and the Princess is made up of six.
Another part of the data contained within the nametables and OAM indicates which color of which palette should be used. There are four palettes to choose from for background colors, and another four palettes for sprite colors, plus a universal transparent/background color that everyone shares.
The NES outputs a screen of size 256x240 pixels, however the PPU actually processes 341x262 “points” of data. This starts from the top of the screen and proceeds from left-to-right on a line-by-line basis, referred to as scanlines. It does it this way because this is how old CRT monitors drew data to the screen.
Once the 241st scanline has been reached, which is the first scanline that isn’t actually displayed to screen, the game enters the vertical blanking interval. The game is notified when the system has reached this vblank interval, and will use this time to edit the nametables, OAM, the palettes, etc. in order to prepare for the next frame that needs to be displayed, without potentially messing with the frame that’s being processed at any current moment.
This, and much more, are important concepts to understand when emulating the PPU. The PPU was, by far, the most taxing part to develop, the most tedious when aiming for cycle accuracy, and seems to be where most novice emulator developers get stuck. It also seems to be the point where most emulator developers stop, with a great number of NES emulators not implementing sound at all.
Audio
The Audio Processing Unit (APU) is responsible for - if it’s not obvious from the name - the sound output. The NES supports 5 channels of audio output: two square waves, a triangle wave, a noise channel, and a delta modulation channel (DMC).
The two square waves make up the most prominent musical sounds and sound effects, the triangle wave is often used like a base guitar in music, the noise channel is used in a variety of ways (for a rhythmic drum sound as in Super Mario Bros 3, or a sword swiping as in the Ninja Gaiden games), and the DMC plays random wave samples to do funky things like play a sound that sounds like a voice talking.
Games configure various parameters of these channels by writing values to specific memory addresses, which are hooked up to registers in the APU, and the APU generates a waveform based on the configured channels.
The square waves are responsible for most of the sound that games produce, like the main melody of the Super Mario Bros theme song. The square channels are where I started, because it’s easier to verify progress aurally.
The square waves have a few configurable units including a frequency sweep that allows sweeping to higher or lower frequencies, a volume envelope that controls the volume, a timer unit with a duty cycle that produces the waveform, and a length control that allows the game to silence the channel completely after a particular number of clocks.
The frequency sweep unit alters the frequency of the waveform. If the unit sweeps to higher frequencies, then the sound will get higher in pitch with each clock cycle. This may be heard in the sound of a ship taking off, or a laser firing.
The timer unit increments the time of the waveform as it is generated. That is, as the waveform is stepped forward by the other units, the timer just ticks along. The duty cycle of the timer unit determines what percentage of the wave is not zero, that is, what percentage of the waveform will actually play. The NES has builtin duty cycle options of 12.5%, 25%, 50% and 75%.
The envelope of a waveform is a smooth line that follows the extremes of the oscillating signal. This is used as the output of the square waves and the noise channel and serves as the volume (or amplitude) of the wave.
The frequency sweep, the timer, and the envelope units of each of the channels are stepped forward by what is referred to as a sequencer. The sequencer operates in either a 4-step or 5-step sequence, depending on which sequencing mode the game has configured the APU with. The mode determines which units are stepped forward during the individual steps of the sequence.
The sounds from each channel are combined together by a mixer, for which documentation about the APU mixer makes trivial to implement. This converts the digital signals of each channel into an analog signal. This analog signal from the mixer is what is sent to the audio backend for playback. I used SDL for my audio.
The individual channels themselves are somewhat straight-forward to implement with a little DSP knowledge - of which I had none before this project - and a few roms with known sounds to check against; Super Mario Bros was my tester, because who doesn’t have the sound of that melody embedded into their soul…
Dynamic Sampling
The most tedious part of the APU for me was sampling.
The NES generates sound at a sample rate of 44.1kHz, which means that 44,100 samples must be retrieved from the APU and fed into the audio backend for playback every second. The audio backend can be setup to play samples at that rate, however the emulator needs to feed the samples in at the right rate. Too few samples and the sound pops and cracks, because the audio is playing all of the samples before more are produced. Too many samples and it will sound great, however it will quickly get out of sync with the gameplay.
I tried tweaking various values and bits of code to get it “just right”, however this was never quite perfect, because the emulator doesn’t run at a perfectly sustainable rate. Some frames from the PPU are generated quicker than necessary to maintain 60 frames per second, and some generate slower. Sometimes the audio would get out of sync slowly, but it may have taken 5-10 minutes of playing to really hear it. And sometimes there would still be audible cracks and pops.
Our eyes don’t notice the difference when things like this happen to the frame rate, however our ears are much more sensitive to imperfections, even if it’s in small amounts.
In the end I opted for a dynamic sampling algorithm, which sounds fancier than it really is.
SDL can use a queue for audio, so the emulator constantly pushes samples into the queue, and SDL drains the queue as it plays back the samples to the user. The emulator constantly checks how many samples are in the queue still waiting for playback. As SDL consumes the queue, the emulator keeps the queue topped up with more samples if it drops below a certain threshold in an attempt to prevent it from ever being empty, avoiding the audio crackling, but it doesn’t let the queue overfill either, to avoid getting out of sync with the gameplay.
This has worked phenomenally and certainly produced the best results of anything else that I tried.
An interesting result of all of the work on the APU is that I fail pretty much all of the test ROMs, but it sounds good, and that matters more to me.
I nearly didn’t work on the APU at all, and was initially happy to stop after the graphics were working, but I saw other emulator developers making progress on their APU’s and it inspired me to get it done, and I’m super happy that I did; it was definitely out of my comfort zone, and I learned a lot about digital signals processing along the way.
Cartridges and Mappers
What turned out to be the most fascinating aspect of the NES was the cartridges themselves. By default, the NES can only address 8KB of pattern table data at a time, and 32KB of compiled byte-code (referred to as PRG-ROM), and although earlier and much simpler games like Donkey Kong can fit entirely within that address space, there are many games that need much more than that.
This data resides within the cartridge itself, and is read by the NES directly from the cartridge, so, to get around these limitations, the game developers got clever; they separated the data into “banks”, where, for example, instead of having a single chunk of 8KB of pattern data, it may have been separated into four 2KB banks, where one of the banks represents the background data, two banks represent the sprite data, and the last bank represents the patterns used for a status bar. These banks could then be swapped out by writing certain values to the PRG or CHR addresses.
Different kinds of cartridges do this in different ways, and this behaviour is categorised into what is referred to as a mapper. There are many kinds of mappers; some allow many banks of pattern data but only the standard 32KB of PRG-ROM, some the other way around, some have many banks of both, some mappers allow a cartridge to contain more than one game (like the common Super Mario Bros + Duck Hunt cartridge). Part of emulating the NES is also emulating these cartridge mappers.
On other consoles, like the SNES, cartridge mappers got super crazy, sometimes bundling more components on the cartridge to perform, for example, heavy mathematical operations faster than the SNES hardware can.
This allowed game developers of the past, and the homebrew developers of today, to get creative and develop much more complicated games than these systems were originally designed for.
Rust
This was my first large project using the Rust programming language. The biggest obstacle in the beginning was deciding on the system design, and a lot of that was dictated by how much (or how little) I knew of the language.
I started out with something using lifetimes, because that seemed to make sense; I had a Console object, which contained a CPU object, a PPU object, and a Memory object, and I needed each of these objects to talk to each other. This model mapped to what everything looked like in my mind.
But that caused all sorts of headaches, with Option<Rc<RefCell<Box<something>>>> and all sorts of things that seemed unnecessary and overly complicated, and surely there was something easier, so I threw away that design and ended up with something that was much more simple in terms of Rust feature usage; there is a Console object, which contains a CPU object, which contains a Memory object, which contains a PPU object. And if anything needed to signal an action back to its parent, it was done so in the return value of its step function. These object relationships didn’t make as much sense to my mental model, but it worked without fighting the lifetime errors and simplified things a lot.
The strictness of the compiler helped out immensely with a few large refactors. All I had to do was iron out the compiler errors (which was almost entirely fixing up import statements), and everything just worked.
One of the more intrusive refactors that I had to do was to move away from using Result types in the memory maps, which are core to the whole emulator and referenced everywhere.
The memory map for the NES specifies that some parts of memory are read-only, and some parts are write-only. So, at the time, it made sense that when trying to write to a bit of read-only memory, the memory map code would return Err(something), and propagate the error up to… somewhere.
But the internals of the NES also specify that these writes simply go nowhere, as in the physical wiring isn’t hooked into anything, so propagating an Err to be handled somewhere up the stack is not the right action. In the end, the only correct action to take is to do nothing when writing to read-only memory, or return 0 (or anything, really) when reading from write-only memory. It was an incorrect design decision in the end, so I ended up removing the Result type entirely from the core of the emulator.
Despite sounding like I had nothing but bad experiences using Rust for this project, it was actually quite the contrary. The compiler warnings and errors when doing bit-wise arithmetic mixing u8, i8, u16, i16, and u32s caught so many problems that could’ve manifested in incredibly weird undefined behaviours in a less safe language.
There’s also something to be said for being able to confidently use a memory-managed language while being able to stay 100% focused on the system itself, instead of constantly worrying about mixing potentially incompatible integer types and free’ing the right memory, as I often do in my C projects. That probably highlights my lack of deep experience with C more than anything, but I still have less experience with Rust than I do with C.
Epilogue
Without a doubt, the times when I learned the most about the NES was while debugging; an off-by-one that resulted in a sprite of the Princess in Donkey Kong being rendered in the incorrect X position was how I really learned about OAM and DMA, Mario not showing up on the title screen of Super Mario Bros was how I really learned about how the SBC instruction worked, Super Mario Bros freezing when Mario crossed the threshold into the second full screen is how I really learned about nametables, the balloon sprite on the title screen of Balloon Fight not showing up was how I really learned about sprite and background priorities, and the triangle wave being disabled early and resulting in a loud popping noise during the opening theme to The Legend of Zelda was how I really learned about the APU internals.
These debugging stories were incredibly satisfying, and I’ve kept a small journal of them.
The experience of writing a NES emulator has been extremely fun and rewarding, to the point that I can’t wait to start my next emulation project. In the meantime though, I’m just happy to enjoy a few old NES games.
Resources
- The NesDev Wiki
- NES Graphics part 1, part 2, and part 3 by dustmop
- NES Rendering Overview by Austin Morlan
- ROMs and Mappers: Why NES Games Can Be So Different On The Same Hardware by 0xabad1dea
- Cartridge Printed Circuit Boards by Near
- Audio: Dynamic Rate Control by Near
- EmuDev Discord Server